**I should let you know that the photos accompanying this post are not great. I was having a really hard time with my camera focusing and taking the pictures at all, which all made more sense when it died completely two days later. Sigh. Suffice it to say, I do have a back up camera, but it is also working very sporadically, so future posts may be rather light on pictures while I get my camera situation sorted out. Wish me luck!**
I am always looking for ways to shave my food budget down, while keeping our diets healthy and nutrient dense. Although we don't eat huge amounts of yogurt, it can be an expensive item when bought by the carton. I am also particularly fond of Greek yogurt, which is thicker, creamier, higher in protein ... and more expensive!
Although I've been making yogurt for a long time, I switched over to this method a few months ago, and love both the simplicity of making it, and the end product - super duper yummy!
One of the biggest selling points in this recipe, for me at least, is that all of the times given are pretty flexible.
Ready? Here we go!
Ingredients:
1/ 2 gallon of Milk (preferably Whole Fat/Full Fat)
1/2 cup of Plain Yogurt (either store bought, or saved from the last time you made yogurt)

Pour milk into your crock pot; turn onto High, and allow to heat up to about 180 degrees Fahrenheit. This allows the milk proteins to denature, and to get the good bacteria in the milk ready for action. In my crock pot this takes about 2 and a half hours, so I just set a timer, and go about my day.

Check the temperature of the milk with a thermometer if you have one. If not, it should be just under boiling.

When it has reached 180 degrees, remove the crock from the base and allow to cool. I do this with the lid off, and the entire crock on a cooling rack.

Leave for approximately 1 hour, until the temperature of the milk is around 110 degrees (warm, but not hot).

Remove about a cup of milk from the crock pot, and mix it with the plain yogurt. Once it is thoroughly blended, pour this mixture back into the crock with the rest of the cooled milk, and gentle stir in. Do not beat or whisk it in.
Turn on your oven to 350 degrees Fahrenheit, for one minute, just to heat it up a little. Then turn off the oven, but leave the oven light on.
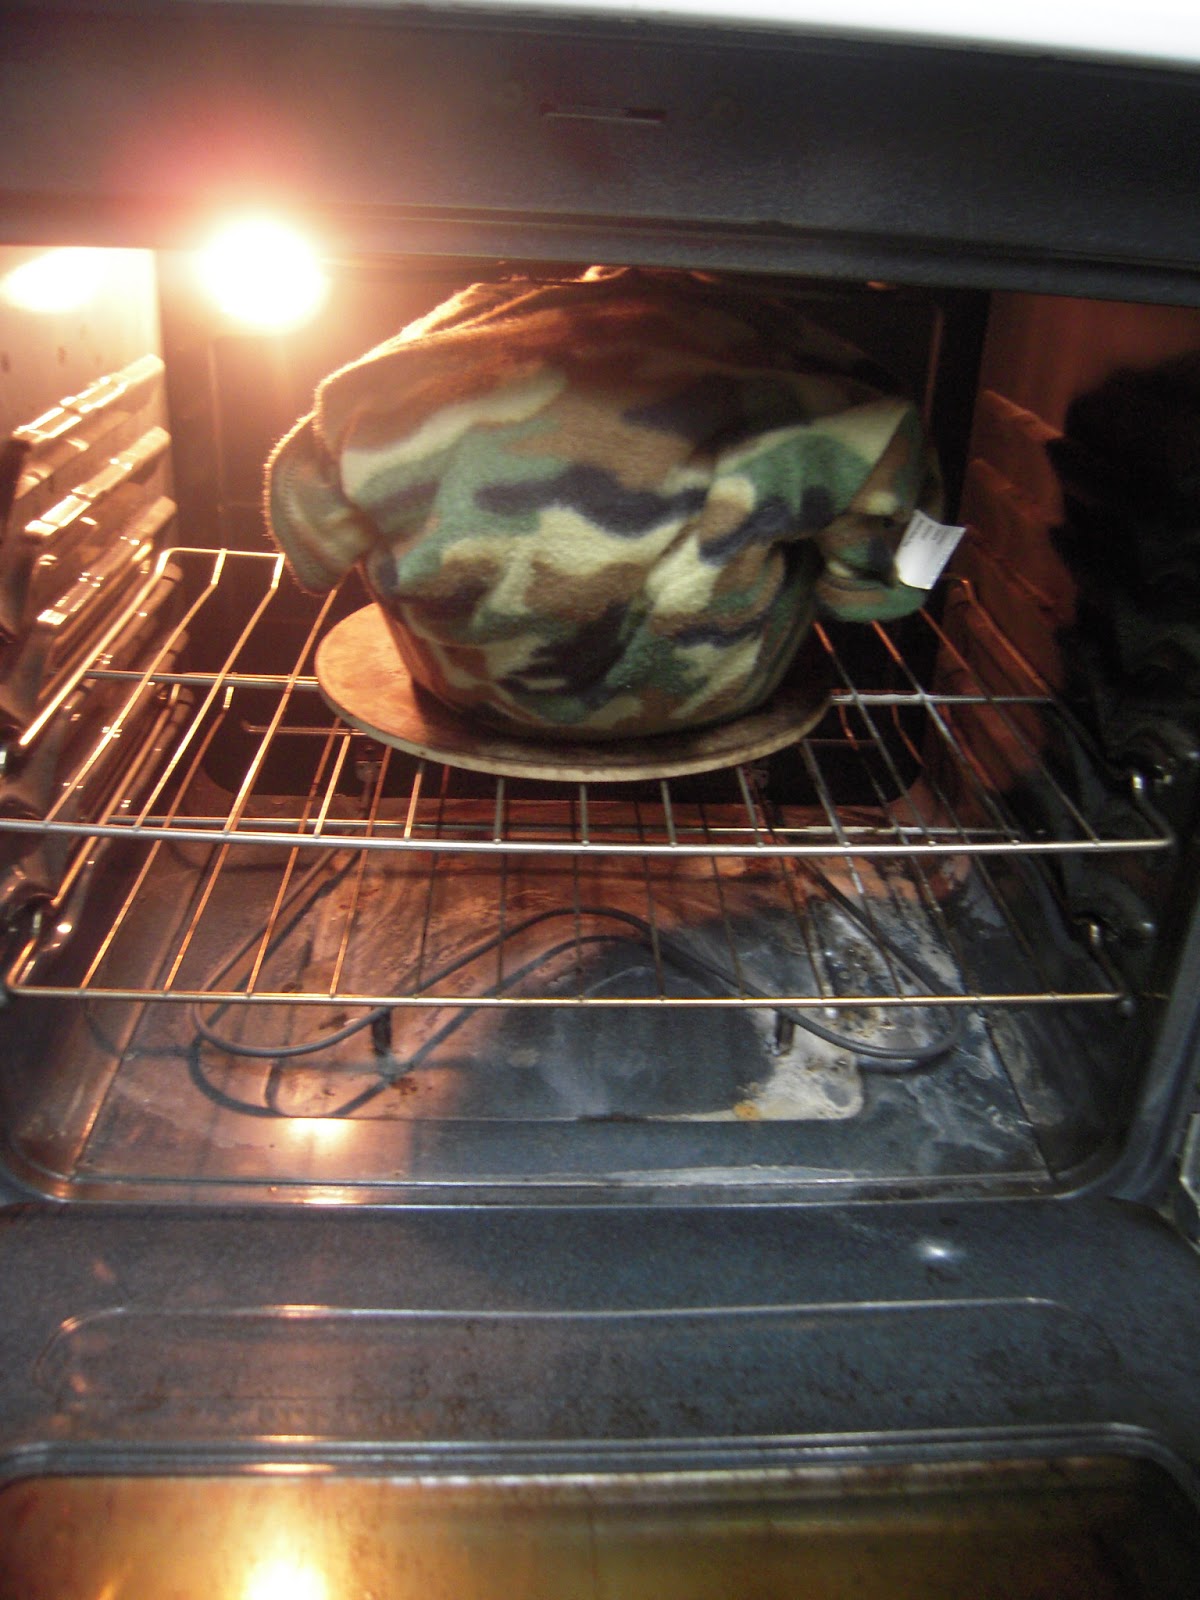
Put the lid back on your crock and wrap the entire crock in a blanket or towel (this part always makes me giggle!!)

Put the entire blanket wrapped package in the oven, and leave it for at least 6 hours, or up to 18 hours.

Take a quick peak - you should have a whole crock full of fabulous home made yogurt!

It is fine as is, but if you want to make it into Greek Yogurt - read on!
Line a fine mesh sieve with a thin piece of fabric. I use a piece of muslin, but I've also heard of people using an old t-shirt or a piece of cheese cloth.


Put a bowl under the muslin lined sieve, and pour the entire crock full of yogurt into the sieve. The whey will drain off into the bowl below, leaving you with thick and creamy Greek style yogurt.

The draining will be slower if you refrigerate it at this stage, faster if you leave it out on the counter. I typically gauge where in my day I am; if it's evening, I pop it in the fridge, knowing I'll wake up to drained Greek yogurt, but if the Little Ones are hungry and impatient for their Greek yogurt, I'll leave it on the counter. In the fridge it usually takes about 4 hours, while on the counter it takes about an hour or so.
Drain until it reaches the desired consistency for your taste. If it drains too much, leaving a very thick yogurt, no worry - just add back in a little of the drained off whey.
Don't forget to put aside 1/2 cup of your yogurt to use as the starter in your next batch.
And finally, enjoy your fabulous, delicious and frugal Greek Yogurt!
We often have Greek Yogurt for breakfast, snack or lunch. It is rich and creamy enough to eat as is, but we will often add fruit, granola (I love this recipe from The Frugal Girl), maple syrup or jam. We use it in smoothies, veggie dips, tzatziki (yogurt dip with cucumber) and quiche fillings.
Rather than using the muslin and sieve to strain off the whey, there are also some nice yogurt strainers, which I must admit I am tempted with. Using the muslin is certainly frugal, but can be messy! Here is one that I've had my eye on ...
One of the biggest selling points in this recipe, for me at least, is that all of the times given are pretty flexible.
Ready? Here we go!
Ingredients:
1/ 2 gallon of Milk (preferably Whole Fat/Full Fat)
1/2 cup of Plain Yogurt (either store bought, or saved from the last time you made yogurt)

Pour milk into your crock pot; turn onto High, and allow to heat up to about 180 degrees Fahrenheit. This allows the milk proteins to denature, and to get the good bacteria in the milk ready for action. In my crock pot this takes about 2 and a half hours, so I just set a timer, and go about my day.

Check the temperature of the milk with a thermometer if you have one. If not, it should be just under boiling.

When it has reached 180 degrees, remove the crock from the base and allow to cool. I do this with the lid off, and the entire crock on a cooling rack.

Leave for approximately 1 hour, until the temperature of the milk is around 110 degrees (warm, but not hot).

Remove about a cup of milk from the crock pot, and mix it with the plain yogurt. Once it is thoroughly blended, pour this mixture back into the crock with the rest of the cooled milk, and gentle stir in. Do not beat or whisk it in.
Turn on your oven to 350 degrees Fahrenheit, for one minute, just to heat it up a little. Then turn off the oven, but leave the oven light on.
Put the lid back on your crock and wrap the entire crock in a blanket or towel (this part always makes me giggle!!)

Put the entire blanket wrapped package in the oven, and leave it for at least 6 hours, or up to 18 hours.
Take a quick peak - you should have a whole crock full of fabulous home made yogurt!

It is fine as is, but if you want to make it into Greek Yogurt - read on!
Line a fine mesh sieve with a thin piece of fabric. I use a piece of muslin, but I've also heard of people using an old t-shirt or a piece of cheese cloth.


Put a bowl under the muslin lined sieve, and pour the entire crock full of yogurt into the sieve. The whey will drain off into the bowl below, leaving you with thick and creamy Greek style yogurt.

 |
| The whey draining off from the yogurt (an action shot!) |
 |
| The drained yogurt |
 |
| The drained off whey |
Don't forget to put aside 1/2 cup of your yogurt to use as the starter in your next batch.
And finally, enjoy your fabulous, delicious and frugal Greek Yogurt!
We often have Greek Yogurt for breakfast, snack or lunch. It is rich and creamy enough to eat as is, but we will often add fruit, granola (I love this recipe from The Frugal Girl), maple syrup or jam. We use it in smoothies, veggie dips, tzatziki (yogurt dip with cucumber) and quiche fillings.
Rather than using the muslin and sieve to strain off the whey, there are also some nice yogurt strainers, which I must admit I am tempted with. Using the muslin is certainly frugal, but can be messy! Here is one that I've had my eye on ...
Do you have a fave recipe that uses yogurt? Or, so you have an easy-peasy recipe for making yogurt? Feel free to leave a comment, or a link back to your own blog; I'd love to hear from you!